Showing posts with label sweets. Show all posts

Tuesday, March 4, 2014

Almond Cake


Love Almond Cake!

SERVES 8 TO 10

If you can’t find blanched sliced almonds, grind slivered almonds for the batter and use unblanched sliced almonds for the topping. Serve plain or with Orange Crème Fraîche.

INGREDIENTS

  • 1 1/2cups plus 1/3 cup blanched sliced almonds, toasted
  • 3/4cup (3 3/4 ounces) all-purpose flour
  • 3/4teaspoon salt
  • 1/4teaspoon baking powder
  • 1/8teaspoon baking soda
  • 4large eggs
  • 1 1/4cups (8 3/4 ounces) plus 2 tablespoons sugar
  • 1tablespoon plus 1/2 teaspoon grated lemon zest (2 lemons)
  • 3/4teaspoon almond extract
  • 5tablespoons unsalted butter, melted
  • 1/3cup vegetable oil

INSTRUCTIONS

  1. 1. Adjust oven rack to middle position and heat oven to 300 degrees. Grease 9-inch round cake pan and line with parchment paper. Pulse 1½ cups almonds, flour, salt, baking powder, and baking soda in food processor until almonds are finely ground, 5 to 10 pulses. Transfer almond mixture to bowl.
    2. Process eggs, 1 1/4 cups sugar, 1 tablespoon lemon zest, and almond extract in now-empty processor until very pale yellow, about 2 minutes. With processor running, add melted butter and oil in steady stream, until incorporated. Add almond mixture and pulse to combine, 4 to 5 pulses. Transfer batter to prepared pan.
    3. Using your fingers, combine remaining 2 tablespoons sugar and remaining 1/2 teaspoon lemon zest in small bowl until fragrant, 5 to 10 seconds. Sprinkle top of cake evenly with remaining 1/3 cup almonds followed by sugar-zest mixture.
    4. Bake until center of cake is set and bounces back when gently pressed and toothpick inserted in center comes out clean, 55 to 65 minutes, rotating pan after 40 minutes. Let cake cool in pan on wire rack for 15 minutes. Run paring knife around sides of pan. Invert cake onto greased wire rack, discard parchment, and reinvert cake onto second wire rack. Let cake cool, about 2 hours. Cut into wedges and serve. (Store cake in plastic wrap at room temperature for up to 3 days.)

HOW WE GOT THE BEST ALMOND FLAVOR—AND CAKE TEXTURE

For a rich, nutty taste and a consistency that’s not too dense, we toast blanched almonds (we dislike the slight bitterness imparted by skin-on almonds) to deepen their flavor. Then we grind them in the food processor. The ground nuts give the crumb an open, rustic texture.

START WITH BLANCHED ALMONDS

TOAST UNTIL GOLDEN BROWN

GRIND WITH FLOUR, SALT, AND LEAVENERS

EGG FOAMS: MIXER VERSUS FOOD PROCESSOR

The goal when mixing most cake batters is to incorporate a lot of air into the eggs so that the cake will bake up light and tall, and a mixer is usually the best tool to get the job done. For our Best Almond Cake, however, we wanted a flat, level top; just a moderate rise; and a texture that was neither too fluffy nor too dense. Ditching the mixer in favor of a food processor did the trick. Here’s why: When eggs and sugar are whipped in a mixer, the whisk gently unfolds the protein strands in the eggs while incorporating lots of air, producing a foam with a strong network that holds on to that air. The outcome? A tall, well-risen, domed cake. A food processor, with its high rpm and very sharp blade, similarly unravels the eggs’ protein strands and incorporates air, but it also damages some strands along the way. The result is just what we were after: a flatter, slightly denser cake.


MIXER: Tall and domed.

FOOD PROCESSOR: Perfectly flat.


Source: Cook's Illustrated

Saturday, February 22, 2014

Red Velvet Mini Cheesecakes


Seems like Red Velvet Cakes, Cupcakes and Cookies
 have been all the rage lately.

Here are two recipes with a twist to the Red Velvet craze . . . 
mini cheesecakes from Betty Crocker and Sally's Baking Addiction.


Ingredients

Crust

36
chocolate wafer cookies, crushed (about 1 3/4 cups)
4 1/2
tablespoons butter, melted
1
teaspoon corn syrup or honey

Filling

2
packages (8 oz each) cream cheese, softened
3/4
cup granulated sugar
2
teaspoons vanilla
2
tablespoons red food color
2
eggs
1/4
cup unsweetened baking cocoa
1/2
cup Original Bisquick® mix
3/4
cup milk

Toppings

2
cups whipping cream
2
tablespoons powdered sugar
Chocolate shavings, if desired

Directions
 
In small bowl, mix Crust ingredients. Divide crumb mixture among cups. Using fingertips, firmly press in bottom of each cup, making sure crumbs are firmly packed.
In large bowl, beat cream cheese with electric mixer on medium speed until smooth. Gradually beat in granulated sugar until fluffy. Beat in vanilla and food color. Beat in eggs, 1 at a time, until well blended. Add cocoa and Bisquick mix, and beat until there are no more streaks and batter looks chocolaty. Pour in milk, and beat until smooth and creamy. Divide batter evenly among cups (cups will be almost full).
Bake 30 to 35 minutes or until centers are firm. Cool 15 minutes (cheesecake centers will sink while cooling). Refrigerate in pan at least 45 minutes. In chilled small bowl, beat whipping cream on medium speed 30 seconds; gradually increase speed to high, and beat until stiff peaks form. During last minute, beat in powdered sugar.
Remove cheesecakes from refrigerator and, using butter knife, gently pop them out of pan. Carefully remove wrappers, and top each chilled cheesecake with large dollop of whipped cream and a sprinkle of chocolate shavings. Serve chilled.
The cheesecakes can be made and frozen ahead of time. Leave cheesecakes in their paper baking cups, and wrap well with plastic wrap. Freeze in airtight container. To thaw, let cakes stand in refrigerator about 2 hours or until ready to eat; top as directed.

Photo and Recipe Source


Click here for another version

of the Red Velvet Mini Cheesecake

from Sally's Baking Addiction!

Tuesday, February 18, 2014

Chocolate Caramel Bars


Love the combination of chocolate and caramel!

I'm craving chocolate tonight, so my recipe searches are gravitating towards these type of sinful sweets.  

Don't these look awesome?  The recipe and photo originates from Roxana's Home Baking, one of my favorite food blogs!  You must check it out for more delicious recipes from Roxana.


Prep Time: 10 minutes
Cook Time: 25 minutes
Total Time: 1 hour, 30 minutes

Ingredients

    • 2 cups (240 grams) all-purpose flour
    • 1/4 cup (56 grams) diced cold butter
    • 1 1/2 cups (300 grams) sugar
    • 1 cup (80 grams) cocoa
    • 2 teaspoons baking powder
    • 1 teaspoon baking soda
    • 1/2 teaspoon salt
    • 3/4 cup (168 grams) melted butter
    • 5 oz (1 small) can evaporated milk
    • 14 oz caramels, unwrapped
    • 1 1/2 cups (226 grams) semi-sweet chocolate chips
    • 12-14 extra caramels

    Instructions
    1. Heat the oven to 350F.
    2. Line a 13X9 baking pan with parchment paper. Set aside.
    3. In a food processor add the flour and cold diced butter. Pulse a few more times until the mixture resembles fine breadcrumbs and all the butter is cut in. You can also use a pastry blender, a fork or rub the butter and flour with your hands.
    4. Add the sugar, cocoa, baking powder, baking soda, salt and whisk to combine.
    5. In a large mixing bowl add the dry ingredients mix and pour the melted butter on top. Add 1/3 cup of the evaporated milk and mix until well combined. The dough it's going to be similar to a light crumby cookie dough.
    6. Spread 2/3 of the dough in the prepared baking pan and set aside. Refrigerate the remaining dough until needed.
    7. In a small saucepan place the remaining evaporated milk and the unwrapped caramels. Stir continuously over low heat until the caramels are melted. Pour over the cookie dough base.
    8. Sprinkle the chocolate chips over the caramel layer.
    9. Take the remaining cookie dough out of the fridge and crumble it on top of the chocolate chips.
    10. Top with the remaining caramels.
    11. Bake for 25 minutes.
    12. It may seem bubbly and undone but once cooled the caramel and chocolate layers will set.
    13. Cool completely in the pan before cutting into bars.


    Roxana's notes about this recipe . . .  After you mix the cake mix with the evaporated milk and melted butter it yields around 3 cups. The recipe suggested to spread half of the dough in the baking pan and the remaining half to be used as a streusel topping. I think it would be better to reserve around 3/4 to 1 cup of dough for the topping to leave room for the caramel and chocolate to ooze out a little bit more. 


    Saturday, April 16, 2011

    Italian Cream Cake


    You would think this is a
    made from scratch cake,
     but it is one of those
     
    semi-homemade recipes 
    to kick  up a plain cake mix 
    and  frosting in a can.  

    Ingredients


    • 1 (18.25-ounce) package white cake mix with pudding
    • 3 large eggs
    • 1/4 cups buttermilk
    • 1/4 cup vegetable oil
    • 1 (3-1/2-ounce) can flaked coconut
    • 2/3 cups chopped pecans, toasted and divided
    • 3 tablespoons rum (optional)
    • 2 (12-ounce) containers cream cheese frosting

    Instructions
    1. Preheat oven to 350ºF. Grease and flour 3 (9-inch) round cake pans.
       
    2. Beat cake mix, eggs, buttermilk, and oil with an electric beater on medium speed for 2 minutes. Stir in coconut and 2/3 cup pecans. Pour into prepared cake pans.
       
    3. Bake 15 to 17 minutes, or until a wooden toothpick inserted in center comes out clean. Cool in pans on wire racks 10 minutes. Remove from pans and cool completely on wire racks.
       
    4. Sprinkle each cake layer with rum, if desired; let stand 10 minutes.
       
    5. Stir together frosting and remaining 1 cup pecans. Spread frosting between layers and on top and sides of cake (see Tips). Chill 2 hours before slicing.


    Frosting Tips


    Always cool the cake layers completely and brush away excess crumbs before frosting. Stack the first 2 layers on a serving plate, bottom-side up, then place the top layer right-side up. This will make a straight and tall cake. Spread a thin layer of frosting on the sides to set any crumbs then spread frosting generously on the sides and tops.


    Recipe source and photo:  Mr. Food's website


    Monday, April 11, 2011

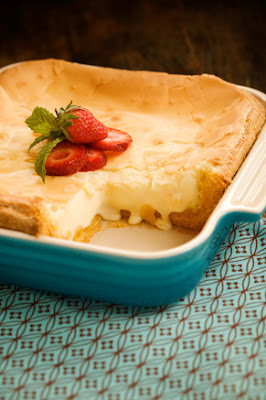
    Gooey Butter Cake


    The title says it all . . . 
    a decadent cake from Paula Deen!


    Ingredients 


    Cake:

    1 18 1/4-ounce package yellow cake mix
    1 egg
    8 tablespoons butter, melted


    Filling:

    1 8-ounce package cream cheese, softened 
    2 eggs 
    1 teaspoon vanilla 
    8 tablespoons butter, melted 
    1 16-ounce box powdered sugar


    Directions


    Preheat oven to 350 degrees F.
    Combine the cake mix, egg, and butter and mix well with an electric mixer.  
    Pat the mixture into the bottom of a lightly greased 13 by 9-inch baking pan.  
    Prepare Filling
    In a large bowl, beat the cream cheese until smooth.  
    Add the eggs, vanilla, and butter and beat together. 
    Next, add the powdered sugar and mix well.  
    Spread over cake batter and bake for 40 to 50 minutes.  
    Make sure not to over bake as the center should be a little gooey.

    Source:  Paula Deen

    Saturday, April 2, 2011

    Milk Chocolate and Almond Croissants


    I've discovered a new show on the Food Network Channel featuring Ann Thornton. Here's a part of the website's bio about Ann and the show . . . 

    "As an expert pastry chef, Anne Thornton shares indulgent recipes for tantalizing treats on her “In the Kitchen” Food Network cooking series, Dessert First With Anne Thornton. Anne demystifies and simplifies the world of pastry and dessert by showing viewers the ins and outs to no-fear baking. From flaky pastries to ice cream cake, Anne’s approachable techniques prove that any home cook can create impressive desserts."
    I've been searching for sweets and comfort foods lately since that funky mood has struck me that calls for this kind of food.  The television has been stuck on the Food Network lately since I have really been bored with food.  If you are a sweet-o-holic like me, you will love this program.  I love her style of cooking . . . easy . . . using convenience foods.  I could not believe how easy these awesome croissants came together and the possibilities for fillings are endless.  My thoughts have turned to using cannoli filling with chocolate chips for something delicious and different . . . can't wait to try it.


    Milk Chocolate and Almond Croissants


    Ingredients

    • 1 (17.3-ounce) package or 2 sheets frozen puff pastry, thawed
    • Flour, for dusting, if needed
    • 4 (1/2-ounce) mini milk chocolate bars, each broken into 4 equal pieces (recommended: Hershey's)
    • 1 large egg, beaten
    • Sugar, for sprinkling
    • 1/2 (7-ounce) package almond paste, divided into 1/2 to 1 teaspoon pieces, shaped like a log or rolled into a ball
    • Almond slices, for garnish

    Directions

    Special equipment: pizza cutter or kitchen shears, ruler
    Preheat the oven to 400 degrees F. Line 2 baking sheets with parchment paper.
    Place 1 sheet thawed puff pastry on the work surface like a sheet of paper or portrait (not horizontal or landscape). If the puff pastry is very sticky, very lightly flour the work surface. Using a pizza cutter or kitchen shears, cut the puff pastry in half, widthwise. Using a ruler as a guide, make an indentation at 2-inch intervals (for the base) across the bottom of each puff pastry half. Cut each half into 8 triangles, with the base of each triangle measuring 2 inches. (They will be very long isosceles triangles.) You'll end up discarding the 2 end pieces to get the most out of your puff pastry piece. This sheet of triangles will be reserved for the chocolate croissants. Repeat the cutting for the second puff pastry sheet that will be used for the almond croissants.
    For the chocolate croissants: Place 1 chocolate piece just above the 2-inch edge of 1 pastry triangle, folding the dough over the chocolate as you tightly roll up the dough, enclosing the chocolate. Repeat with the remaining puff pastry and chocolate. Place the pastry rolls on the baking sheet, seam-side down. Cover the croissants with plastic wrap and place the baking sheet in the refrigerator until the dough firms up. (You can make these croissants 1 day ahead up to this point.)
    Just before baking, remove the croissants from the refrigerator, brush with the beaten egg and sprinkle lightly with sugar.
    For the almond croissants: Place 1/2 to 1 teaspoon almond paste, shaped like a small log, just above the 2-inch edge of 1 pastry triangle, folding the dough over the almond paste as you tightly roll up the dough, enclosing the almond paste. Repeat with remaining puff pastry triangles and almond paste. Place the pastry rolls on a baking sheet, seam-side down. Cover the croissants with plastic wrap and place in the refrigerator until the dough firms up. (You can make these croissants 1 day ahead up to this point.)
    Just before baking, remove the croissants from the refrigerator, brush with the beaten egg and sprinkle lightly with sugar and sliced almonds.
    Bake until the pastries are golden brown, about 15 minutes. Serve warm or at room temperature.
    Cook's Note: These croissants are so easy and so good you'll want to stuff them with practically everything. They are perfect as is-chocolate croissants and almond croissants, but if you're feeling a little adventurous combine the chocolate and almond paste (scale back just a touch on the almond paste) in one croissant for a decadent treat. But don't stop there, you can stuff these mouthwatering minis with savory fillings too. Ham and cheese croissants are crazy good!

    For more recipes from this episode, click here.
    Visit Our Etsy Shop